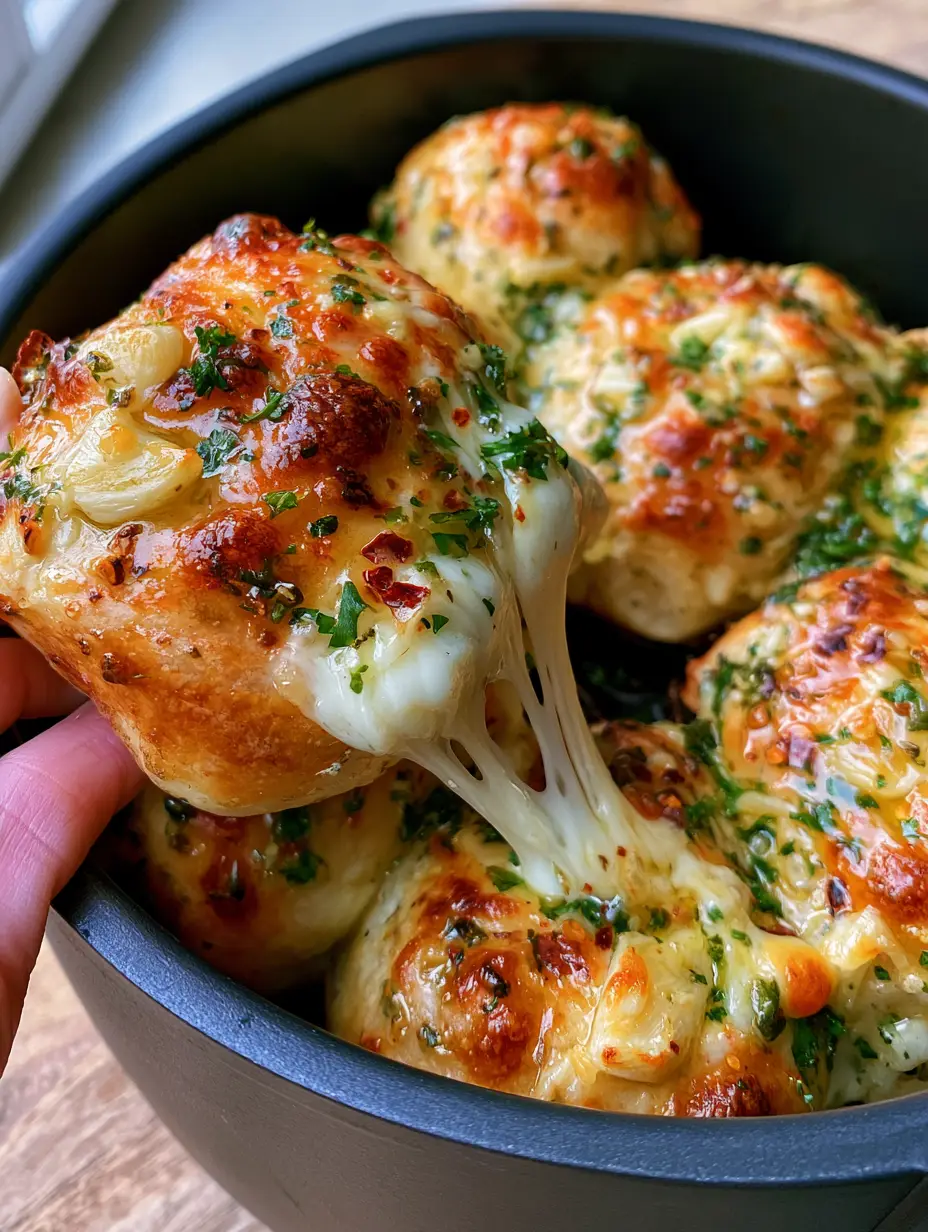
There is nothing quite like the sensory explosion of breaking open a perfectly toasted roll to find a steaming, molten center of white mozzarella cheese. These cheese stuffed garlic bread balls represent the pinnacle of viral comfort food, combining the convenience of your air fryer with the artisanal flavors of a high-end Italian bakery. Each bite delivers a symphony of textures: a bubbly, golden-brown crust, a soft and airy interior, and a 6-inch cheese stretch that is practically made for social media.
When you pull these rolls apart, the steam vapor carries the intoxicating aroma of roasted garlic and fresh herbs directly to your senses. The heavy, glossy glaze of melted herb butter pools in the crevices of the dough, ensuring that every single crumb is infused with savory richness. Whether you are hosting a game day party or looking for a decadent side dish, this recipe is engineered for maximum satisfaction and visual appeal.
The secret lies in the contrast between the chunky minced garlic and the bright green flecks of fresh parsley, punctuated by the subtle heat of dried red pepper flakes and the crunch of coarse sea salt. By using refrigerated biscuit dough as a canvas, we achieve professional-grade results in a fraction of the time. This isn’t just a snack; it is a culinary experience designed to keep your guests coming back for “just one more.”

Why These Molten Cheese Bombs Are a Total Game Changer
- The Legendary 6-Inch Stretch: By using specific mozzarella geometry and high-heat air frying, we achieve a molten core that creates an extreme, thick, and steaming cheese pull every time.
- Viral Visual Appeal: With a perfectly bubbly, golden-brown crust drenched in a glossy herb glaze, these rolls look exactly like a professional food photographer’s masterpiece.
- Textural Contrast: You get the crunch of coarse sea salt flakes, the bite of chunky minced garlic, and the pillowy softness of air-fried biscuit dough in every mouthful.
- Air Fryer Efficiency: Achieve deep-fried results with a fraction of the oil and none of the mess, finishing in under 10 minutes of active cooking time.
Essential Components for the Perfect Garlic Dough Cluster
To achieve the specific visual and structural results seen in our professional blueprint, you must select high-quality ingredients that behave predictably under high heat. While the air fryer does the heavy lifting, the science of the dough and the chemistry of the fat are what create that signature glossy finish.
Refrigerated Flaky Biscuit Dough: 1 can (16.3 oz / 462g). This serves as our structural foundation, providing the buttery layers and leavening required to house the molten cheese without leaking.
Low-Moisture Part-Skim Mozzarella: 4 oz (113g), cut into 1-inch cubes. Using low-moisture cheese is critical; it provides the “stretch” without releasing excess water that would make the dough soggy from the inside out.
Salted Butter: 4 tbsp (56g), melted. The fat in the butter acts as a flavor carrier for the aromatics and creates the “heavy, glossy glaze” that defines the visual appeal of these cheese stuffed garlic bread balls.
Fresh Minced Garlic: 3 cloves (approx. 15g). We want chunky minced garlic, not a paste, to ensure visible pieces that roast into sweet, golden nuggets during the air-frying process.
Fresh Italian Parsley: 2 tbsp (8g), finely chopped. Fresh parsley provides the bright green flecks that contrast beautifully against the golden crust, offering a grassy freshness to cut through the richness.
Dried Red Pepper Flakes: 1/2 tsp (1g). These provide subtle heat and tiny pops of red color, enhancing the visual complexity and flavor profile.
Coarse Sea Salt Flakes (Maldon): 1 tsp (5g). These flakes don’t just season; they provide a targeted burst of saltiness and a delicate crunch that lingers on the tongue.
Invisible Essentials: You will also need a small amount of neutral oil spray for the air fryer basket to prevent sticking and ensure the bottom of the rolls are as crisp as the tops.
Must-Have Tools for Air Fryer Success
Achieving a professional result requires more than just the ingredients; you need the right tools to handle the heat and the glaze. A modern matte black air fryer (or any standard air fryer) is the primary vessel for this transformation.
A high-quality silicone pastry brush is non-negotiable for achieving that “heavy, glossy glaze.” It allows you to push the garlic and herbs into the nooks and crannies of the dough. You will also need a sharp chef’s knife for mincing the garlic and parsley to the precise textures described in our visual blueprint.

The Blueprint: Step-by-Step Culinary Forensic Instructions
Phase 1: Preparing the Mozzarella Core
Start by cutting your low-moisture mozzarella into uniform 1-inch (2.5cm) cubes. Consistency is key here; if the cheese is too small, it will vanish into the dough, and if it is too large, it will prevent the dough from sealing properly, leading to a blowout.
Pro tip: Place your cheese cubes in the freezer for 10 minutes before stuffing. This slight chill ensures the dough fully cooks and browns before the cheese reaches its maximum liquid state, resulting in a more dramatic stretch when pulled apart.
Phase 2: Encapsulating the Cheese in Dough
Open the biscuit dough and separate each biscuit. If they are large, you can split them in half to make smaller, more appetizer-friendly balls. Flatten each piece of dough into a disc about 3 inches (7.5cm) in diameter.
Place one chilled mozzarella cube in the center. Carefully wrap the dough around the cheese, pinching the seams tightly. Roll the ball between your palms to create a smooth, spherical shape. Any gaps in the seam will act as an escape route for the cheese, so ensure a perfect seal.
Phase 3: The First Air Fryer Blast
Lightly spray your air fryer basket with oil. Arrange the dough balls in a cluster, leaving just a tiny bit of space (about 1/4 inch) between them. As they expand, they will touch, creating that beautiful “cluster” look seen in the smartphone photo.
Set your air fryer to 350°F (175°C). Air fry for 6-8 minutes. At the 6-minute mark, check for a light golden-brown color. They shouldn’t be fully dark yet, as we need to apply the glaze for the final roasting phase.
Phase 4: Crafting and Applying the Glossy Garlic Glaze
While the balls are in their first fry, melt the salted butter in a small microwave-safe bowl. Stir in the chunky minced garlic, finely chopped fresh parsley, and dried red pepper flakes. The heat of the butter will start to bloom the garlic and pepper flakes, releasing their essential oils.
Open the air fryer and, using your silicone brush, generously drench each roll in the garlic butter mixture. Ensure the chunky garlic bits are distributed evenly across the tops. Return to the air fryer at 380°F (190°C) for another 2-3 minutes until the crust is a deep, bubbly, golden-brown and the butter is sizzling.
Phase 5: The Final Flourish and Visual Cues
Carefully remove the cluster from the air fryer basket. Immediately sprinkle with the coarse sea salt flakes while the butter is still wet so they adhere. You should see visible steam vapor rising from the rolls. Serve immediately while the interior is at peak molten temperature to achieve that viral 6-inch stretch.
Expert Tips for the Ultimate Cheese Pull
- The Pinch Test: When sealing the dough, give the seam a firm twist. This creates a mechanical lock that prevents the mozzarella from erupting during the expansion of the dough.
- Don’t Crowd the Air: While we want the balls to touch slightly to form a cluster, overcrowding the basket will prevent the hot air from circulating, leading to pale, doughy sides.
- Garlic Size Matters: Do not use a garlic press. Pressed garlic burns quickly and becomes bitter. Hand-mincing into “generous chunks” ensures they roast into sweet, savory morsels.
- Temperature Control: If your air fryer runs hot, lower the temperature to 325°F (160°C) for a slightly longer duration. This ensures the center is molten before the exterior becomes too dark.
Creative Pairings for Your Garlic Bread Balls
These cheese stuffed garlic bread balls are incredibly versatile. They pair perfectly with a rich creamy tomato spinach pasta for a complete comfort meal. If you are looking for a lighter accompaniment, consider serving them alongside stuffed bell peppers with rice and veggies to balance the decadence of the cheese and butter.
For those hosting a full Italian night, these rolls are the ideal starter for authentic Italian recipes like lasagna or carbonara. They also make a fantastic side for a quick lunch or dinner when you need something high-impact with minimal effort.
How to Store and Revive Your Leftovers
While best enjoyed fresh for that maximum cheese stretch, you can store leftovers in an airtight container in the refrigerator for up to 3 days. To reheat, avoid the microwave at all costs, as it will make the dough rubbery.
Instead, place the balls back in the air fryer at 350°F (175°C) for 3-4 minutes. This will re-crisp the crust and bring the mozzarella back to its molten state. You may want to add a fresh dab of butter to restore the glossy finish.
Frequently Asked Questions
Absolutely! Bake them at 375°F (190°C) for 12-15 minutes. The air fryer is faster and creates a crunchier crust, but the oven works well for larger batches.
Yes, you can use pizza dough. However, you may need to increase the air frying time by 2-3 minutes as pizza dough is denser than flaky biscuit dough.
The key is using low-moisture, whole-milk mozzarella and serving them immediately while the cheese is at its peak melting point (around 150°F/65°C).
Garlic burns easily. To prevent this, mince the garlic into chunks rather than a fine paste, and only apply the garlic butter during the last few minutes of cooking.
This usually happens if the dough isn’t sealed tightly enough or if there are thin spots in the dough. Ensure you pinch the seams firmly and roll them into a smooth ball to create a thick, even barrier.
The Master Recipe for Cheese Stuffed Garlic Bread Balls

Cheese Stuffed Garlic Bread Balls: The Ultimate Air Fryer Mozzarella Bombs
Ingredients
Equipment
Method
- Cut the mozzarella into 1-inch cubes and chill in the freezer for 10 minutes to ensure a better stretch.
- Flatten each biscuit dough piece, place a cheese cube in the center, and pinch the seams tightly to seal.
- Place balls in a cluster in a greased air fryer basket. Air fry at 350°F (175°C) for 6-8 minutes until light golden-brown.
- Brush with melted garlic-herb butter. Increase heat to 380°F (190°C) and fry for 2-3 more minutes until deep golden and bubbly.
- Remove from air fryer and immediately sprinkle with coarse sea salt flakes while hot and glossy.
Notes
Use only low-moisture mozzarella for the best 6-inch stretch.
Join Our Culinary Community
We hope these cheese stuffed garlic bread balls become a staple in your kitchen! The combination of steaming mozzarella and roasted garlic is truly a match made in heaven. If you enjoyed this recipe, please leave a comment below and let us know how your cheese stretch turned out! Don’t forget to follow us on Pinterest and share your creations with the community. Happy air frying!