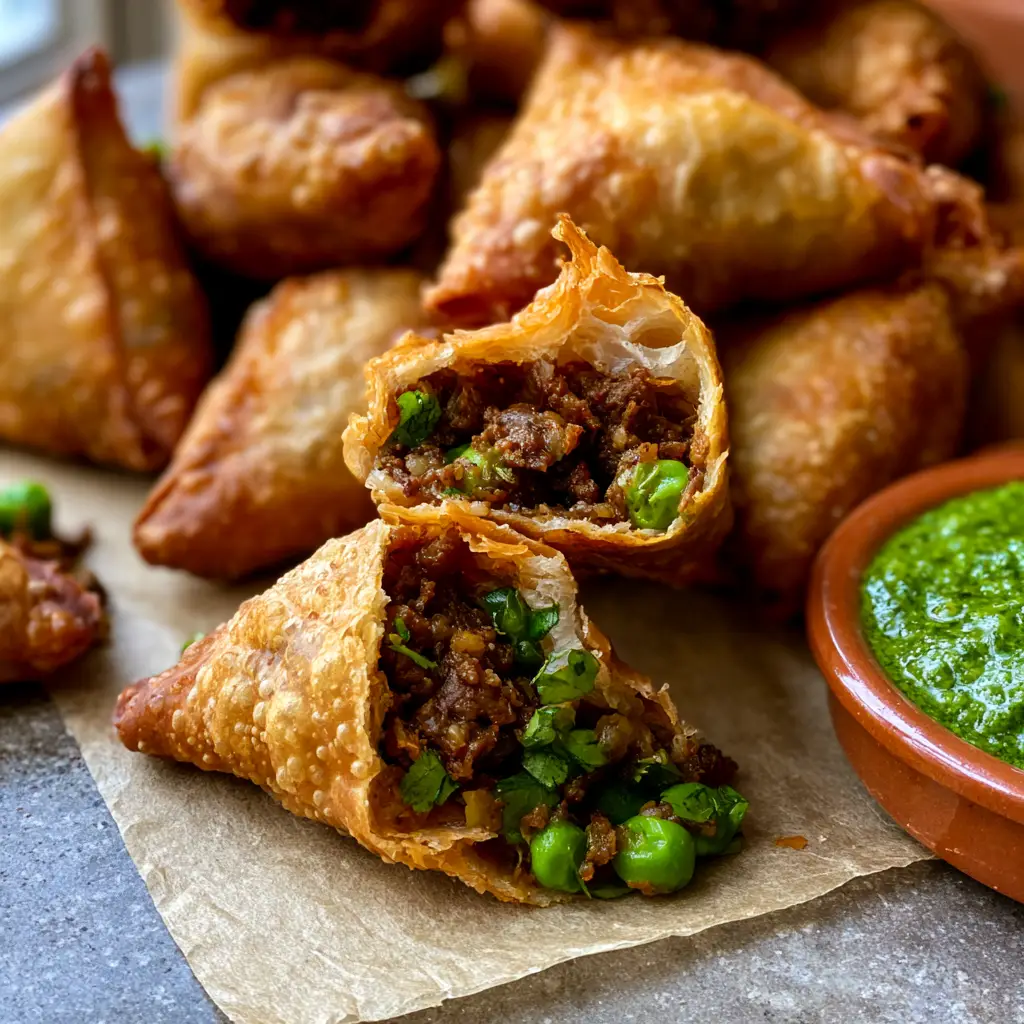
There is a specific sound that defines a perfect Keema Samosa: the high-pitched shatter of a micro-bubbled crust giving way to a cloud of aromatic steam. If you have ever stood at a street corner in Mumbai or Lahore, you know that the visual of golden-brown triangles resting on grease-proof brown paper is a culinary siren song.
Today, we are moving beyond the soggy, thick-crusted imitations found in frozen aisles. We are crafting a professional-grade Keema Samosa that features a thin, blistered shell and a robustly seasoned minced mutton filling that stays juicy until the very last bite.
This recipe is designed for the home cook who craves that authentic, handheld smartphone-photo-worthy result. From the vibrant green peas tucked inside the dark, spiced meat to the emerald-green mint chutney served on the side, every element here is optimized for flavor and forensic visual perfection.

Why This Mutton Keema Samosa Recipe Works
- The Micro-Bubble Texture: We use a specific “moyon” technique, rubbing fat into the flour to create a shatteringly crisp exterior with visible tiny bubbles.
- Visual Contrast: The filling combines dark, savory mutton with bright green peas and finely chopped cilantro for a striking interior appearance.
- Structural Integrity: These samosas are engineered to hold their shape without leaking grease, even when served on simple grease-proof parchment paper.
- Authentic Spice Profile: A balanced blend of toasted cumin, coriander, and garam masala ensures the mutton is flavorful without being overwhelming.
The Anatomy of a Perfect Samosa Crust and Filling
To achieve the result seen in professional culinary photography, every ingredient serves a dual purpose: flavor and structural science. We aren’t just making a snack; we are building a multi-textured experience that rivals authentic Italian recipes in its dedication to tradition.
Mincing Mutton (Ground Lamb): 1 lb (450g). The star of the show; ensure it has at least 15% fat content so the filling remains steaming and moist rather than dry and crumbly.
All-Purpose Flour (Maida): 2 cups (250g). This provides the canvas for our crust; its gluten structure is essential for rolling the dough thin enough to snap easily.
Ghee or Clarified Butter: 4 tbsp (60g). This is the “invisible” foundation that, when rubbed into the flour, creates the shortcrust texture responsible for those coveted micro-bubbles.
Small Green Peas: 1/2 cup (75g). These provide a pop of sweetness and a vibrant green visual that contrasts beautifully against the seasoned mutton.
Fresh Cilantro: 1/2 cup (15g), finely chopped. Adding this at the very end of the cooking process preserves its color and bright, citrusy aroma.
Fresh Mint Leaves: 1 cup (30g). Essential for the vibrant green mint chutney that serves as the cooling acidic counterpoint to the deep-fried pastry.
Carom Seeds (Ajwain): 1 tsp (2g). These tiny seeds are traditional in the dough, providing a subtle medicinal note and aiding in the digestion of the fried pastry.
Essential Equipment for Deep-Fried Excellence
To get that professional grey stone surface look, you need the right tools in the kitchen first. A heavy-bottomed kadai or Dutch oven is non-negotiable for maintaining the steady oil temperature required for a blistered crust.
You will also need a fine-mesh spider strainer to lift the samosas out of the oil, allowing them to drain efficiently without becoming sodden. A rolling pin (belan) is required to get the dough to a translucent thinness, ensuring the “snap” described in our visual blueprint.
Step-by-Step: Engineering the Perfect Keema Samosa
Phase 1: The Spiced Mutton Filling
Heat 1 tbsp (15ml) of neutral oil in a large skillet over medium-high heat. Add the minced mutton, breaking it up with a wooden spoon until it loses its pink color and begins to brown deeply.
Stir in finely diced onions, ginger-garlic paste, and your dry spices. Cook until the onions are translucent and the mutton is coated in a dark, aromatic spice base.
Add the small green peas and a splash of water, covering the pan for 5 minutes. This ensures the peas are tender but still hold their bright green shape.
Remove from heat and fold in the finely chopped fresh cilantro. The filling should be steaming hot and fragrant, ready to be encased in the pastry.
Phase 2: The Micro-Bubble Dough
In a large bowl, whisk together the flour, salt, and carom seeds. Pour in the melted ghee and use your fingertips to rub the fat into the flour until it resembles coarse crumbs.
Gradually add cold water, 1 tbsp (15ml) at a time, kneading into a very stiff dough. A stiff dough is the secret to a crust that doesn’t soak up excess oil.
Cover the dough with a damp cloth and let it rest for 30 minutes. This relaxes the gluten, making it easier to roll out into those thin, crisp sheets.
Phase 3: Assembly and The Perfect Fold
Divide the dough into small balls and roll each into a thin oval. Cut the oval in half to create two semi-circles.
Form a cone by overlapping the straight edges, using a dab of water to seal the seam. Stuff the cone with the cooled mutton and pea filling, leaving space at the top.
Pinch the edges shut tightly. The samosa should feel firm and heavy in your hand, much like the weight of a well-stuffed spicy tuna onigiri.
Phase 4: The Science of Deep Frying
Heat your frying oil to 325°F (160°C). Slide the samosas in gently; the oil should bubble softly, not violently.
Fry for 10-12 minutes, turning occasionally. You are looking for a deep golden-brown color and the appearance of those tiny micro-bubbles on the surface.
Drain the samosas on grease-proof brown paper. This mimics the professional aesthetic of high-end street food and helps maintain the shatteringly crisp texture.
Expert Tips for Success
- Temperature Control: If the oil is too hot, the crust will brown but the dough will remain raw inside. Start low and slow.
- The “Snap” Test: You know you’ve succeeded when you snap a samosa in half and it produces a clean break with visible steam escaping from the mutton.
- Chutney Consistency: Your mint chutney should be a vibrant emerald green. Blanch the mint and cilantro for 5 seconds in boiling water before blending to lock in that color.
- Rest the Dough: Never skip the 30-minute rest, or your samosas will shrink and become chewy rather than flaky.
Storage, Reheating, and Freezing
Leftover Keema Samosas can be stored in an airtight container in the refrigerator for up to 3 days. To restore the “shatter” to the crust, reheat them in an air fryer or oven at 350°F (175°C) for 5-8 minutes.
For long-term storage, you can freeze the assembled, uncooked samosas. Place them on a tray to flash-freeze, then transfer to a freezer bag; they will stay fresh for up to 2 months and can be fried directly from frozen.
What to Serve With Keema Samosa
While these are iconic on their own, they are often served as part of a larger spread. They make an excellent appetizer before a heavy main course like beef with pasta in creamy garlic sauce.
If you are hosting a fusion brunch, consider serving them alongside creative avocado toast ideas or even fluffy homemade pancakes for a sweet and savory contrast. The key is to provide acidic and fresh pairings to cut through the richness of the fried mutton.
Frequently Asked Questions
While you can bake them at 400°F (200°C), they will not achieve the signature micro-bubble crust or shatteringly crisp texture that deep-frying provides.
Yes, ground beef is an excellent substitute. Ensure you use a lean-to-fat ratio of 85/15 to maintain the juicy, steaming interior described in the recipe.
To prevent oxidation, add a teaspoon of lemon juice or blanch your mint and cilantro leaves in boiling water for 5 seconds before blending them into the chutney.
Large blisters usually occur if the frying oil is too hot when the samosas are first added. Start with oil at 325°F (160°C) for a smooth, finely bubbled texture.
Chewy dough is often caused by over-kneading or not adding enough fat (ghee). Ensure you rub the ghee into the flour until it reaches a breadcrumb consistency before adding water.
The Ultimate Mutton Keema Samosa Recipe
Keema Samosa: The Ultimate Recipe for Shatteringly Crisp Mutton Pastries
Ingredients
Equipment
Method
- Sauté minced mutton in a pan until browned and steaming. Add onions, ginger-garlic paste, and spices.
- Fold in green peas and cilantro. Cook until peas are tender and the filling is dark and fragrant.
- Mix flour and ghee until it reaches a crumbly texture. Add water to form a stiff dough.
- Rest dough for 30 minutes, then roll into thin ovals and cut into semi-circles.
- Fold dough into cones, fill with mutton, and seal the edges with water.
- Fry at 325°F (160°C) until golden brown with visible micro-bubbles on the crust.
Notes
Rubbing the ghee into the flour thoroughly is the secret to a professional shatteringly crisp shell.
Mastering the Keema Samosa is a rite of passage for any serious home cook. The combination of the steaming, spiced mutton and that impossibly crisp shell is a sensory experience that no other snack can replicate.
If you enjoyed this deep dive into culinary forensics, please share your results on Pinterest and tag us! We love seeing your micro-bubbled crusts and vibrant chutneys.